


Nginx reverse proxy guide — this feature is one of the most powerful ways to secure, optimize, and scale modern web applications. By placing Nginx in front of your backend servers, you create a fast, secure gateway that controls traffic, reduces load, and protects your infrastructure.
A reverse proxy is one of the most important and high-impact features of Nginx — and it’s the main reason Nginx powers large-scale platforms like Netflix, GitHub, Dropbox, and Cloudflare.
It acts as a secure gateway between the client and your backend servers, ensuring performance, security, and full traffic control.
⭐ What Is a Reverse Proxy? (Simple Explanation)
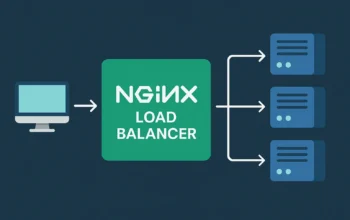
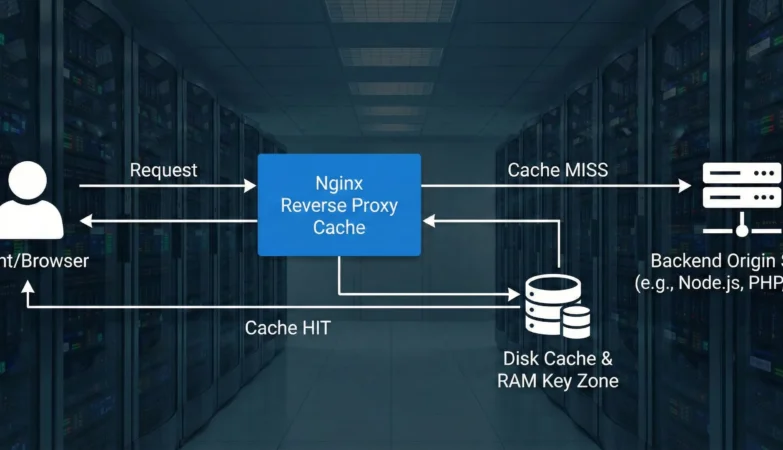
A reverse proxy sits in front of your application servers and handles all incoming requests before they reach your backend.
Client → Nginx Reverse Proxy → Backend Server
Nginx receives the traffic, processes it, secures it, optimizes it, and then forwards it to your internal application — making your infrastructure faster, safer, and more scalable.
🚀 Why Nginx Reverse Proxy Is So Powerful
✔ 1. Hides Your Backend
The real server location is never exposed to attackers.
✔ 2. Handles SSL/TLS
Nginx manages HTTPS termination, reducing CPU load on backend systems.
✔ 3. Filters Malicious Traffic
Combined with rate limiting & ModSecurity, Nginx becomes a front-line security shield.
✔ 4. Boosts Performance
It can:
- Cache responses
- Compress content
- Serve static files instantly
- Reduce load on backend apps
✔ 5. Enables Load Balancing & Scaling
You can have multiple app servers behind one proxy.
🔍 How Nginx Processes Reverse Proxy Requests
When a request arrives:
1️⃣ Client sends request
2️⃣ Nginx evaluates server + location blocks
3️⃣ Nginx forwards request using proxy_pass
4️⃣ Backend responds
5️⃣ Nginx modifies, secures, or caches the response
6️⃣ Sends the final optimized output to the client
This makes Nginx a smart traffic controller, not just a forwarding tool.
🧩 Reverse Proxy Configuration Example (Production-Ready)
server {
    listen 80;
    server_name hackervault.tech;

    location / {
        proxy_pass http://127.0.0.1:8080;

        proxy_set_header Host $host;
        proxy_set_header X-Real-IP $remote_addr;
        proxy_set_header X-Forwarded-For $proxy_add_x_forwarded_for;
        proxy_set_header X-Forwarded-Proto $scheme;
    }
}
🧩 $host — The Hostname Requested by the Client
What it represents:
The exact domain or subdomain the user typed into the browser.
Example:
hackervault.techapi.hackervault.tech
Why it matters:
Your backend needs to know which hostname was requested, especially if multiple apps run on the same server.
How Nginx uses it:
proxy_set_header Host $host;
This ensures correct routing, accurate redirects, and proper domain handling.
🧩 $remote_addr — The Real IP Address of the User
What it contains:
The original IP address of the client making the request.
Example:
192.168.1.55102.33.244.12
Why it matters:
If you don’t forward $remote_addr, your backend will think every request comes from Nginx itself (like 127.0.0.1).
This breaks:
- Login rate limiting
- Security logging
- Geo-location
- IP-based blocking rules
How Nginx uses it:
proxy_set_header X-Real-IP $remote_addr;
🧩 $proxy_add_x_forwarded_for — Full Chain of Client IPs
What it contains:
A comma-separated list of IP addresses showing the complete path of the request.
Example:
45.62.20.15, 127.0.0.1
Why it matters:
This is used for:
- Identifying real user IP behind proxies
- Detecting spoofed/abusive traffic
- Logging for analytics & security tools
How Nginx uses it:
proxy_set_header X-Forwarded-For $proxy_add_x_forwarded_for;
This ensures your backend has the full request history.
🧩 $scheme — Whether the Client Used HTTP or HTTPS
What it represents:
The protocol used by the incoming request:
httphttps
Why it matters:
Your backend may need this to:
- Generate correct URLs
- Handle redirects properly
- Avoid HTTPS → HTTP downgrade loops
- Maintain consistent security policies
How Nginx uses it:
proxy_set_header X-Forwarded-Proto $scheme;
🔐 What this config ensures:
- Correct client IP is forwarded
- Backend receives real protocol info
- Prevents broken HTTPS redirects
- Ensures compatibility with APIs and frameworks
🛡️ Security Advantages of Reverse Proxy Setup
- Hides backend IP addresses
- Blocks scanners, bots, & direct attacks
- Supports WAF & OWASP CRS
- Enables DDoS protection & throttling
- Prevents direct exploitation of backend services
A reverse proxy drastically reduces your attack surface.
⚡ Performance Advantages
- Static files served instantly
- Backend CPU load drops
- Faster TTFB & lower latency
- Supports micro-caching for APIs
- Perfect for high-traffic applications
Nginx’s event-driven architecture makes reverse proxying extremely efficient.
🎯 In One Line:
Nginx as a reverse proxy gives you security, speed, scalability, and complete control over all incoming traffic — making it the backbone of modern web infrastructure.


That’s a solid point about game design encouraging replayability! I’ve been seeing ads for scatter link app download apk and their focus on responsible gaming is a welcome change. Hopefully, more platforms prioritize player wellbeing! 🤔
78betinnova, huh? Sounds fresh! Thinking of giving them a spin. Anyone had any luck over there? Spill the tea! 😉 78betinnova
Win777affiliate, huh? Yeah, I checked it out a bit. Not my favorite, but some people seem to swear by it. The layout could use a little work, in my humble opinion. But hey, to each their own. Check out win777affiliate and form your own opinion!
Straight up, jilibet777ph is the real deal! The games are fire and the bonuses are worth it.Been pretty consistent with my wins too. You should try your luck! jilibet777ph
The w388app works great on my phone. Easy to navigate and place bets quickly. A must-have if you’re always on the move. Download the app here: w388app
Heard rumors about ngonclub. Something about it being new and having pretty good promotions. Thinking about checking it out to find a new place to spend some time. ngonclub
I don’t think the title of your article matches the content lol. Just kidding, mainly because I had some doubts after reading the article. https://accounts.binance.info/da-DK/register?ref=V3MG69RO
Thanks for sharing. I read many of your blog posts, cool, your blog is very good.
So convenient having 74betapp on my phone. Makes placing bets on the go a breeze. Get the app here 74betapp.
Just a heads up, the peraplaylogin process is super smooth. No annoying glitches or anything. Makes it easy to jump right into the games. Thumbs up for that! peraplaylogin
Just went to peso888login. Easy enough to sign up. Now the real question: can I win something? Will report back after a few spins. Wish me luck! Login to peso888login now.
Thanks for sharing. I read many of your blog posts, cool, your blog is very good.
Thank you for your sharing. I am worried that I lack creative ideas. It is your article that makes me full of hope. Thank you. But, I have a question, can you help me? https://accounts.binance.com/lv/register?ref=SMUBFN5I
Your article helped me a lot, is there any more related content? Thanks!
Thank you for your sharing. I am worried that I lack creative ideas. It is your article that makes me full of hope. Thank you. But, I have a question, can you help me?
Your point of view caught my eye and was very interesting. Thanks. I have a question for you.
Thanks for sharing. I read many of your blog posts, cool, your blog is very good. https://accounts.binance.com/ph/register?ref=IU36GZC4
Can you be more specific about the content of your article? After reading it, I still have some doubts. Hope you can help me.
Can you be more specific about the content of your article? After reading it, I still have some doubts. Hope you can help me.
7gamesonline, has a nice design and good categories to choose from. They might just have something you’re looking for. Have a look: 7gamesonline
Vuaclubclub sounds like a fancy place. What’s the vibe there? Good community? Sweet promotions? Tell me more! Thinking about checking it out. You can find it here vuaclubclub.
Yo, anyone playing on bj3888? How are the odds? Are they fair? Do they scam? Really need some feedback before I even make an account! Let’s examine bj3888.
Your point of view caught my eye and was very interesting. Thanks. I have a question for you. https://accounts.binance.com/lv/register?ref=SMUBFN5I
I don’t think the title of your article matches the content lol. Just kidding, mainly because I had some doubts after reading the article.
I don’t think the title of your article matches the content lol. Just kidding, mainly because I had some doubts after reading the article.
I don’t think the title of your article matches the content lol. Just kidding, mainly because I had some doubts after reading the article.
Your point of view caught my eye and was very interesting. Thanks. I have a question for you.
Can you be more specific about the content of your article? After reading it, I still have some doubts. Hope you can help me.
Thank you for your sharing. I am worried that I lack creative ideas. It is your article that makes me full of hope. Thank you. But, I have a question, can you help me?
Your point of view caught my eye and was very interesting. Thanks. I have a question for you. https://www.binance.info/register?ref=QCGZMHR6
Can you be more specific about the content of your article? After reading it, I still have some doubts. Hope you can help me.
Your article helped me a lot, is there any more related content? Thanks!
Thank you for your sharing. I am worried that I lack creative ideas. It is your article that makes me full of hope. Thank you. But, I have a question, can you help me?
Came in for one specific question and got answers to three I had not even thought to ask, and a look at firstisnotequallast extended that bonus value pattern, the kind of resource that anticipates reader needs rather than just answering the literal question asked is the gold standard and this site reaches it.
I don’t think the title of your article matches the content lol. Just kidding, mainly because I had some doubts after reading the article. https://accounts.binance.com/register/person?ref=MBLCVVZG
Can you be more specific about the content of your article? After reading it, I still have some doubts. Hope you can help me. https://www.binance.com/register?ref=JW3W4Y3A
I don’t think the title of your article matches the content lol. Just kidding, mainly because I had some doubts after reading the article. https://accounts.binance.bh/register/person?ref=GGYHGRE
Your article helped me a lot, is there any more related content? Thanks!
Thank you for your sharing. I am worried that I lack creative ideas. It is your article that makes me full of hope. Thank you. But, I have a question, can you help me? https://accounts.binance.bh/ph/register-person?ref=IU36GZC4
Thank you for your sharing. I am worried that I lack creative ideas. It is your article that makes me full of hope. Thank you. But, I have a question, can you help me? https://www.binance.com/register?ref=IXBIAFVY
Your article helped me a lot, is there any more related content? Thanks! https://accounts.binance.bh/es-LA/register-person?ref=VDVEQ78S
Thank you for your sharing. I am worried that I lack creative ideas. It is your article that makes me full of hope. Thank you. But, I have a question, can you help me?
Your point of view caught my eye and was very interesting. Thanks. I have a question for you. https://www.binance.bh/register?ref=QCGZMHR6
Your article helped me a lot, is there any more related content? Thanks! https://accounts.binance.com/register/person?ref=W49FLGDN
Your article helped me a lot, is there any more related content? Thanks! https://accounts.binance.com/en-ZA/register?ref=B4EPR6J0
[6007]2222bets অফিসিয়াল লগইন | বাংলাদেশে সেরা অনলাইন ক্যাসিনো,2222bets অ্যাপ ডাউনলোড করে অনলাইন স্লটস খেলার নিয়ম জানুন। বিকাশ দিয়ে টাকা জমা করে আজই আপনার অ্যাকাউন্ট খুলুন এবং খেলা শুরু করুন। visit: 2222bets
Top notch graphics and really engaging gameplay. It is honestly one of the best gaming experiences I have had in a long time. Big thanks to ck888game
[5037]1xbet লগইন ও অ্যাপ ডাউনলোড | বিকাশ ক্যাসিনো ডিপোজিট গাইড,1xbet লগইন করার নিয়ম জানুন এবং অ্যাপ ডাউনলোড APK করে নিন। বিকাশ দিয়ে ক্যাসিনো ডিপোজিট ও লাইভ ক্যাসিনো খেলার নিয়ম শিখতে ভিজিট করুন। visit: 1xbet
The bonuses here are actually legit and not just bait. I had a great run last weekend. You guys should check out ak444login.
Thank you for your sharing. I am worried that I lack creative ideas. It is your article that makes me full of hope. Thank you. But, I have a question, can you help me?
Such a fun gaming experience. I love how they keep updating the games. If you are looking for action, ph200jili is the way to go.
I don’t think the title of your article matches the content lol. Just kidding, mainly because I had some doubts after reading the article.
If you are looking for a real solution to win more often, this is the place. The tips and the platform are top notch. idsolusiwin is a hidden gem.
Really impressed with the security and transparency of this platform. It feels safe to deposit and play here. Trust phbunos88
Top notch service and the registration process was a breeze. I had a great run last night. Head over to idmagnum188 and see for yourself!
Finally found a platform that doesn’t lag during peak hours. The game variety is insane and the payouts are processed quickly. Definitely giving 288jilicasino a go again tomorrow.
The most transparent platform I have used in the PH region. Very intuitive design and easy to navigate. polymarketphilippines is the way to go.
[2809]Captogel: Login Daftar Situs Slot Gacor Deposit Dana,Captogel memudahkan login dan daftar captogel apk untuk akses slot gacor dana tanpa potongan serta situs casino deposit pulsa. Yuk, gabung sekarang! visit: captogel
Thank you for your sharing. I am worried that I lack creative ideas. It is your article that makes me full of hope. Thank you. But, I have a question, can you help me? https://accounts.binance.info/register/person?ref=W49FLGDN
I don’t think the title of your article matches the content lol. Just kidding, mainly because I had some doubts after reading the article. https://accounts.binance.bh/register/person?ref=IXBIAFVY
The variety of games here is insane! I spent hours exploring different slots and the graphics are top notch. Super fun time at okbeyslot.
Your article helped me a lot, is there any more related content? Thanks!
Thank you for your sharing. I am worried that I lack creative ideas. It is your article that makes me full of hope. Thank you. But, I have a question, can you help me?
Thanks for sharing. I read many of your blog posts, cool, your blog is very good.